Showing posts with label Rainbows. Show all posts

Monday, March 31, 2014

Rainbow Cookies


Well, we just had St. Patrick's Day, a bake sale and a preschool rainbow color picnic all in one week, so of course I was on a mission to make something extra festive and brilliant. So Rainbow Cookies it was! There were a couple recipes online but they were either in grams (and I don't have the patience to bother converting to good ol' cups and other measurements that only make sense to Americans.) or YouTube videos (who has the time to WATCH somebody else make cookies?! No thanks!) So I used my brain and my mom's Christmas cookie recipe (which has the bonus of me KNOWING it's delicious!).

   In comparison to my Mom's cookies which require rolling out, cutting, rolling out, cutting, rolling out, cutting, (and baking about a hundred cookie sheets), then frosting in a million colors (Granted, they're beautiful in the end, but I'm over it about halfway through), these cookies were a cinch. The stacking of the colors into an arch-shaped log isn't terribly thrilling and a little time consuming (about a half an hour to mix the colors and stack the log) but after chilling the log, you're home free with just slicing and baking. And they are ADORABLE! and BRILLIANT! And everybody will want to know how you did it!

I did this in two days to spare my sanity and what little time I have in a day between drop-off and drop-off and toddler-feeding (seriously this girl eats 5 meals a day.) and then pick-up and pick-up. And, yeah, I'll admit it, I do this stuff during the day because I hate to see my adult time get eaten up by baking for bake sales and picnics. Also, I am blessed with children who think baking time is quality hang time.

OK, so, really, this is


HOW YOU DO IT!
1. Mix up your butter cookie dough, or sugar cookie dough. To be honest, I'm not sure what kind of dough my mom's cookies are but it works and tastes delicious and that's all I need to know.
Here's the recipe I altered to make the rainbow cookies. The real recipe for Christmas Cookies to follow.


RAINBOW COOKIES

  • 1 c. softened unsalted butter
  • 1/2 c. sugar
  • 1 egg
  • 2 tsp vanilla
  • 3 cups sifted flour (Honestly, I just stir the flour in my canister before lightly spooning it into the cup, it's less of a pain in the caboose and the results are good.)
  • 1 tsp. baking powder
  • 1/2 tsp salt
Cream together butter, sugar, vanilla and egg. Sifte together flour, salt and baking powder. Stir together flour, salt and baking powder. 

Add flour mixture gradually to butter mixture.


2. Roll the dough into a cone-shaped log. Divide into 6 sections with each ball being slightly larger than the last. (Ignore that extra ball in the background of my picture, I was doing a double batch.)


3. Put a thumbprint in the middle of each ball and put your food coloring in. I used gel colors. It was a little less messy and the colors are more vibrant. The small ball is purple, then blue, green, yellow, orange, then red is the largest.


(again, ignore my doubles, I was doing that double batch.)


4. Roll the purple ball into a log about 1" in diameter. Mine was about 7-8" long.
 (In the end the log was about a foot, just so you know.)


5. With each subsequent color, flatten the ball into a rectangle that will wrap around the log to make an arch. This is about how mine measured out: blue was about 2.5" wide, then green was 3.25, yellow4, orange 4.75 and red 5.5. With each color getting about an inch longer with every addition, because the log gets stretch a little longer every time you wrap a new color. Really smoosh them on there so there hopefully won't be gaps between the layers.


Keep going....


Keep going....


Done!


6. Put the log into the refrigerator for at least an hour. I did overnight, so onto:


DAY TWO:

7. Preheat oven to 375*.

8. Take the log out of the fridge. Cut the ends off, taking off only as much as you can to make a nice flat surface on either end.


9. Cut the rest of the log into slices 1/4" thick. Sometimes you'll get gaps between the colors, I just kind of smoosh the back together gently, sometimes I rock the log back and forth along the arch to smoosh the colors together more before cutting. So far they don't fall apart after baking so take that for that's worth.


 10. Bake on parchment lined cookie sheets, leaving a little space between them, for 10 minutes or until edges just golden brown.


11. The bottoms of the rainbows will be a little pushed out, so while the cookies are warm cut off the bottom of each rainbow with a sharp knife to get a nice clean edge. Cool on wire racks.


I suppose Skittles might sue me if I say "Taste the rainbow," but look at these, how can I resist!?

Thursday, June 6, 2013

Pony Bead "Glass" Sun-catchers


For Mother's Day (and yes, I realize that was a whole month ago, but that's the life I lead these days.) the boys and I (with the aid of a nap from the baby.) made sun-catchers out of pony beads. It's really simple and they come out very pretty. They're also long-lasting and hard to break. Winning combination. Even the Fox, who does not like to sit for art, loved making them and has since requested to make them for his teachers' gifts at the end of the year.

Here's What You Need:
  • transparent pony beads (9 mm)
  • metal muffin tin and/or metal cookie cutters and a metal baking sheet
  • a grill (or an oven but it gets kind of a fumey for the indoors.)

Here's What You Do:

     1. Preheat your gas grill to high.

     2. Meanwhile, fill up your muffin tins with patterns (or willy-nilly) of pony beads. Keep it to one layer. Or fill up the cookie cutters set up on the cookie sheet.


      3. Heat up your designs on the grill until the beads melt, about 15 minutes. Keep an eye on the cookie cutters because as the beads melt they might seep under the edges and when they cool it's a lot harder to get the plastic out of the cookie cutter. (I've read on other sites that you can do this in a 400* oven for about twenty minutes, but make sure that if you do, to have your windows wide open- the fumes are overwhelming!)


     4. Cool.


    5. Pop your creations out of their molds. I was surprised how easily the suncatchers came out of the tins. I thought for sure we were going to lose the tin, but just flipping it over and making a quick bang to the underside with a mallet made them pop right out.


   6. Drill a hole in the tops of your suncatchers and string a plastic thread through.


   7.Hang in a sunny spot and enjoy!


 Making these were a huge hit with my kids and a great gift for the grandmothers (and aunts and teachers and the Fox even kept one for himself that he carried around with him for a week.)


* No bake-ware was harmed in the process of this project.

Wednesday, February 6, 2013

Rainbow Crayons

 
We love to recycle our broken crayons. It seems a waste to throw them away, but who needs broken crayons!? For our valentines this year we made heart shaped crayons with our old, broken crayons. It's very easy and fun to do and you don't need much to do it! There are a lot of ways to do this, but with all the "recipes" all you need is some old broken crayons and a silicone mold (and an oven.).


What You Need:
  • old broken crayons (if you have little kids, you have these.)
  • silicone mold with fun shapes. (You might want to forever designate these to crafting afterward and you can buy cheapy molds at Ikea or Target. I got mine at Target a few years ago in the dollar area.)
  • Knife and cutting board for very thick crayons.


What You do:
1. Peel all the paper off the old, broken crayons.

2. Break them up some more. You may need to cut extra thick crayons with a knife, they're tough to break, but the thin ones are a snap. (literally!) At this point my kids had a great time sorting them into piles of different colors.

3. Have your Octopi fill the molds with bits of crayons. You can do different shades of the same color, do different colors for a swirly rainbow effect, or do themed crayons like "fall" with reds and yellows and oranges and "night" with dark blues and purples and bits of silver for stars.


4. Put the filled molds into a preheated 200* oven just until the crayons melt. Keep an eye on your crayons. They'll take about 15-20 minutes to melt. The kids had a fun time coming to see them melt at different stages.


 5. When melted take the molds out to cool on the counter or put in the freezer to speed the process. Be very careful when taking the molds out of the oven, melted wax is very flimsy and super hot!

6. When cool and hard, pop the crayons out of the molds.

7. Color! Or double stick tape to cards made from card stock with phrases like "You color my world" and "You melt my heart" and gift to other Octopi for Valentine's Day.


*Tip: To clean your silicone molds, spill a little oil in the tray and swish it around. Let is stand for a little bit then scrub our your trays with soap and water. It really cleans up pretty well.

Wednesday, September 5, 2012

Dying Rainbow Macaroni for Crafts

 I just felt the need to dye colorful macaroni and make necklaces with my octopi the other day. It turns out it's not at all hard to do. In fact it's easy and fun and the end result is brilliant!

We used rubbing alcohol to dye ours but I have read you can use vinegar as well which would be more friendly to kids who tend to put things in their mouths, but from our experience the alcohol worked really well to get vibrant colors. I haven't tried vinegar so I can't say if one's better than the other.

Pasta is a really cheap product. We bought a couple different varieties for a dollar a box- penne, ziti and ziti rigotti. Anything with a hole will work but the straighter pastas like the ziti rigotti and penne worked best for my 3 and 5 year olds for stringing so consider avoiding elbow macaroni when working with preschoolers.

This is a quick and easy project that little hands can lend a hand with. The dying alone is a family project. I like a craft where the process is just as fun as the product. Otherwise, what's the point?

And the projects you can DO with the end results are endless. Necklaces and mosaics. Christmas tree strings. They can be used for sorting shapes and colors and sizes. Counting, adding, subtracting. Practicing fine motor skills of stringing.

So.

Here's What You Need:
  • pasta with holes, straight tube-like pasta is best (although the slightly curved ziti did dye the best!)
  • food coloring in red, yellow, blue (and green cause that's how it comes you know!)
  • rubbing alcohol (we used isopropyl)
  • ziplock bags (we used freezer bags and they still seeped a little at the zippers, so beware and maybe double up!)
  • paper towels
  • 1 cup measuring cup
  • tablespoon


Here's What You Do:
  1. Decide how many different colors you are going to make and get out that many bags.
  2. In each bag, measure 1 tablespoon of rubbing alcohol.  (Or even a 1/2 tbs might be fine.)
  3. Drop 10-15 drops of food coloring in each bag of alcohol to make your colors.
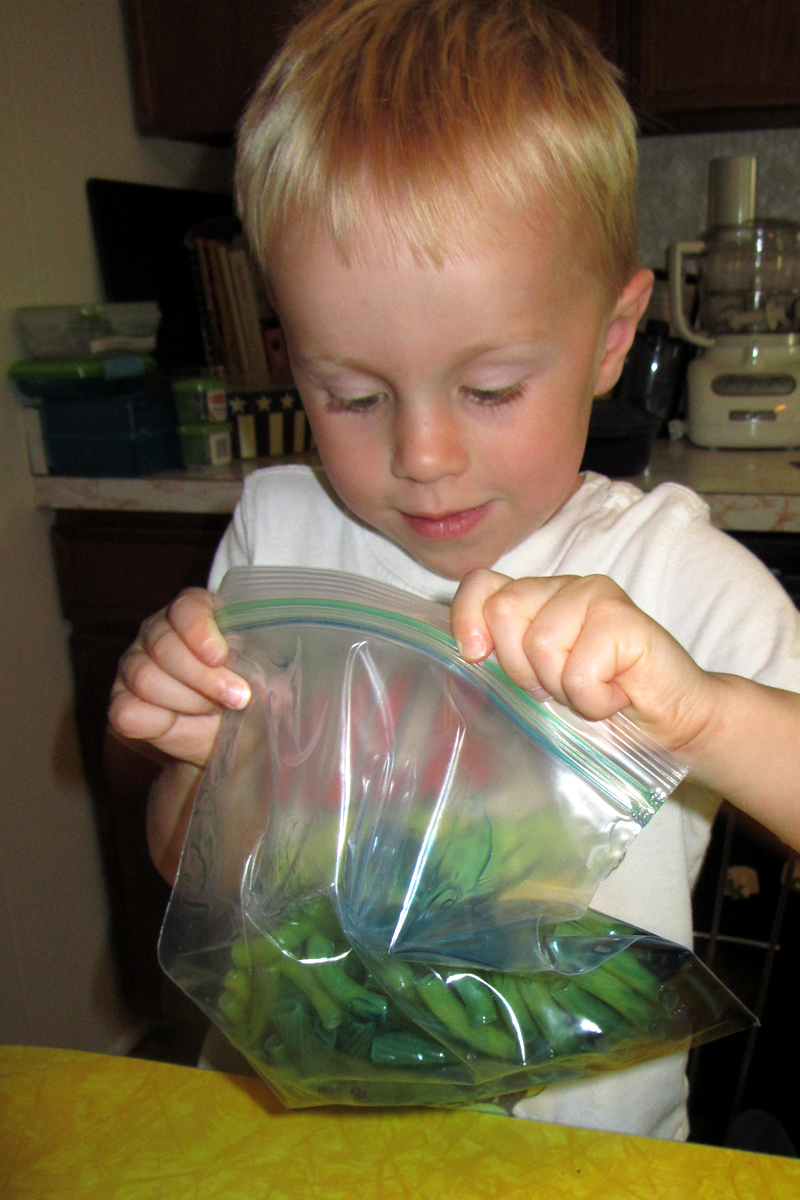
  4. Meanwhile have your octopus fill the one cup measuring cup with the pasta(s) of his choice. Heap it on there. Let him dump it all in one of the bags while you hold it up. (Don't let the dye out, yuck!)


5. Close it up realllll tight and let him squish that pasta all around in the dye.


6. Repeat with all your colors.


7. After they're mixed up really well, lie the bags flat on a paper towel-lined cookie sheet.


 8. Let them sit there for a couple hour, flipping every so often. *We did two and a half hours for the red, orange, yellow and green. But purple and blue just did not come out as well as I wanted (what're you gonna do- pasta is yellow in nature!) so I dyed them a second time in 1/2 tbs rubbing alcohol and more dye and repeated the process for another 2 hours. This time they came out nicely!*

9. When the pasta has reached your desired hues, drain out the excess liquid from the bags.

10. Dump each color of  pasta in one layer, not touching the other pastas, onto paper towel-lined cookie sheets, plates, whatever.

11. Let dry. If it's a sunny day put them out there and they will dry in no time! Our pasta was ready to use in 30 minutes on a hot sunny day.


12. Admire your beautiful pasta. I couldn't help but layer it all in a big jar like a rainbow. It was just so pretty too look at!


Making Necklaces with your Pretty Pasta.


Tie a piece of pasta onto the end of a length of yarn (a couple feet will do it.). Tape the other end for ease of stringing. Let your octopus get to work stringing macaroni. When he's all done, untie the pasta end, leave the pasta there or take it off, and tie the two ends together. Easy peasy.


Thursday, July 5, 2012

Pipe Cleaner Rainbow


Whatever you call them- pipe cleaners, chenille stems- they are a great crafting material. They're fuzzy, they're bendy. You can twist them up and twist them together. You can use them for making animals, as stems on flowers (heck, I use them in the kitchen to clean out those nasty straws on sippy cups too.).

Yesterday, after way too much television, it was time to do something with our hands and creativity. Spiff and I decided we wanted to make a rainbow. But we're pretty bored with paper rainbows. Ah ha, I had just bought pipe cleaners for another project that very morning. Of course there were a rainbow of colors. But gluing them onto paper is pretty boring, and also pretty frustrating frankly. Pipe cleaners don't lend themselves much to the 2D or glue. But they do have nifty bending powers and they do have prickly ends just suited for sticking them into things. Like an egg carton. And, voila, our rainbow craft was born.


What You Need:
  • Pipe cleaners in the colors of the rainbow
  • an egg carton
  • craft glue
  • cotton balls
  • an embroidery needle or pencil or paper clip end for poking.


What You Do:
  1. Rip the top of your egg carton off so you just have the bumps. Cut the bumpy bottom of you egg carton down the middle the long way so you have a long row of 6 cups.
  2. In each second cup in from the ends, poke a line of holes with your needle for each of your pipe cleaners. This is where we'll shove the ends through. So you'll have a hole for each end of each stem.
  3. Bend the purple pipe cleaner into an arch, push one end through the innermost hole on each side. pull them ends so it'll be small enough to fit inside the next color. Do the same with blue in the neighboring holes, green in the next one, yellow in the next, orange, then red. Adjust the ends if you have to so they fit inside each other.
  4. Now bend up the ends so they tuck nicely into the cup on the underside. Now you have your rainbow.
  5. Let's make some clouds! (Because egg cartons are ugly.) Stretch several cotton balls so they're wispy and glue them all around and on top of the exposed egg carton.
  6.  


And that's all there is to it! 

Thursday, March 29, 2012

Rainbow Cupcakes

Thanks to Disney's Family Fun we found this recipe for rainbow cupcakes. They were the perfect thing to bring to Spiff's school color picnic this month. It's Rainbow month. These cupcakes were very time-consuming to make- about an hour before you even get them in the oven (and the layering is not for the little ones, though the color mixing is great for counting and learning colors.) but the results are worth it! (You know, to make them once or twice a year anyway.)

Tuesday, March 20, 2012

Easy Rainbow Cupcakes

Just add Skittles and taste the rainbow.


To get all the colors, buy an original package and a wild berry package of Skittles.

Friday, March 16, 2012

Leprechaun Trap

Leprechauns are tricky. If you ever want to see one, you have to be clever. They're attracted to rainbows and gold. They love to eat potatoes. Decorate an old shoe box with rainbows and gold. Sprinkle in some shamrocks if desired. My son insisted a colorful blanket would convince a passing-by Leprechaun to take a snooze, but just in case we baited our trap with a potato. Prop the shoe box lid open with a wooden spoon or ruler and- Voila! You have yourself a Leprechaun trap. When he comes by (which he will- how could he resist such glitz and glam!?) he will fumble around inside trying to get the potato out and knock the spoon with his caboose. Then the lid will close and- BAM! You've got him! Or do you? He might escape and only leave behind some gold-foiled coins and a mess!

Wednesday, March 16, 2011

Pot of Gold Rainbow


We go to a lot of birthday parties and use a lot of gift bags. This means we also have a lot of tissue paper. I happened to check and we had all the colors for a rainbow. My kid loves rainbows and tomorrow is St. Patrick's Day so I could not resist. We made a Rainbow with a Pot of Gold at the end. It was definitely a parent-assisted endeavor with all the cutting involved but there was plenty for little fingers to do- glue, glue, glue and even some fun stretching and crumpling which my toddler was more than happy to assist my preschooler in.

What You Need:

tissue paper in rainbow colors, cut into long strips 1" wide.
white cardstock
cotton balls
string, cut about double the length of the tissue strips
gluestick
tape
scissors
hole punch


What You Do:

Cut your cloud out of the white cardstock. Ours was the full 8.5 inches wide so all 7 strips of color could sit nicely in a row along it. Take your glue stick and glue a line along the back of your cloud. Put the ends of the tissue strips on this line, one by one, right along. Do it backwards- purple (or "violent" as my kid calls it) to red so when you turn it over it's in the right order (red, orange, yellow, green, blue, indigo, violet.). Pat, pat, pat.

Turn it back over. Cover the front of the cloud with more glue and stick cotton balls all over it, stretching them out a little to make them more, I don't know, wispy and cloud-like. Voila, rainbow and cloud. You can stop here, or you can add your pot of gold:

We folded a scrap of cardstock in half and cut out a pot shape, then colored one side of each black. Then we crumpled up orange tissue paper and stuck it on the blank back of one along with one end of the string. Then we glued the other side of the pot on top of that for a tissue sandwich, having both black sides facing out.

Hole punch the top of your cloud. String the other end of the string through that, leaving enough to tie a loop for hanging. Knot it and tie that loop.

Hang it up in a window.


Sunday, February 6, 2011

Snow: A Great Blank Canvas.


It was a whopping 45 degrees here today and sunny- practically spring! Except our yard is covered in feet of snow. So we did the only thing that made sense- we gave our snow a little spring color- and spray-dyed a rainbow. It's a fun and unusual (dare I say funusual?) snow activity and, more important, easy! It's also a great way for kids to learn about mixing colors in a nontraditional way.

Here's what you do:

Get 3 clean and empty spray bottles- old cleaning bottles or plant spray bottles.
Add some water and several drops of food coloring. Red in one, yellow in another, blue in the last.
Go to town on that white canvas- SNOW!!!