Tuesday, July 16, 2013

Felt Bean Bags


I am surprised I have never made a bean bag for my kids. I mean, they're so simple and easy and the uses in games are endless. Put a bucket in the middle of the room and toss some bean bags in. Carry it between your knees in a race. Throw them through a hula hoop. The reason I came to make some now is an upcoming birthday party with a lack of game ideas. And bonus, after the game, the little guests can take a bean bag home as a favor. And so I set forth.

What You Need:

  • Felt in various colors
  • Thread
  • Sewing Machine (or do it by hand with a needle, cause you could you know.)
  • Pins
  • Beans (I used Lentil because they felt nice and because they are small enough that the baby would not choke if she came across a bean on the floor that escaped during my crafting- and a lot did because I had some help filing the bags.)
  • Wide-necked funnel (or in my case a piece of paper and tape.)

What You Do:

       1. Cut felt into squares. I did 4.5" so I could get 2 bean bags out of one 9x12" sheet of felt.

       2. Pin two squares back to back, putting a pin in each corner so the squares don't shift while sewing. (I learned the hard way it doesn't pay to be too lazy not to.)

       3. Sew around three sides and most of the 4th, stopping an 1-2" from the corner. I got on a roll a couple times and just sewed all four sides, so I had to rip some stitches- whoops! Learn from my mistake and stick a pin where you mean to end.  Like sew.  (I am so funny.)
--Excuse my rudimentary drawing. I am terrible about taking pictures when little hands are helping.

       4. Insert your funnel (or you rolled up paper cone. Or a bottle with the bottom cut off and the cap off the neck.) in the opening that's left. 

       5. Pour in some beans. We used about 1/2 cup and some tiny fistfuls for ours. (As an aside the kids loved running their hands in the beans and playing with them.)


       6. Sew the opening shut.

       7. Play!


Egg Carton Tulips

Using individual egg cartons ripped from the box and pipe cleaners, Squidgee and I made some flowers.


I love reusing what would otherwise be trash in a craft project. Usually I use egg cartons to hold paint (see that sidebar?) but this time around we decided to paint them instead. (And used a paper plate as a palette instead.)

Here's What You Need:
  • Cardboard Egg Carton
  • Craft paints
  • paint brushes
  • Pipe Cleaners, yellow and green
  • Pencil (for hole poking.)
Here's What You Do:

        1. Tear egg carton into individual cups,or cut them if you prefer to be neat. 

        2. Have your octopus paint the cups different colors.


        3. Let them dry.


        4. Punch a hole with a pencil in the bottom of each cup.

        5. Take a yellow pipe cleaner and fold it in half. Insert the folded end into the hole from the inside of the cup so you have a loop coming out the bottom.

        6. Put an end of a green pipe cleaner through the loop of the yellow pipe cleaner. Fold the end down and twist around the other end of the green pipe cleaner to hold it to the yellow one.  Push up the twisted "knot" so it's snug in the hole of the "flower".

        7. Twirl the ends of the yellow pipe cleaner around the pencil to make it look more... I dunno, pistil and stameny. (Yeah, I just made stamen an adjective; my high school English teacher and Biology teacher would be impressed.)

        8. Make a bunch and put them in a cup for pertiness. (Excuse me. It's getting late, I get punchy.)


Tuesday, June 11, 2013

Hole Punch Confetti

      We make confetti out of colored scraps of cardboard. It's great for crafts and inside cards and won't haunt your carpet, waiting to attack you like glitter. Also, it's always handy. We just raid our recycling bin with a hole punch.


       Our favorite use for our confetti is as "sprinkles" on this cupcake birthday card. We first made a cupcake birthday card for the 30th birthday of our legally blind cousin 2.5 years ago, so that she could FEEL her birthday card if not see it. Since, if I ask Spiff to make a birthday card, this is what he requests we make. A scrunched up piece of tinfoil, a cupcake top of foam or felt, and a candle and flames also out of scrap cardboard all glued onto a card. And a touch of glitter glue. (Glitter trapped in glue is alright.) Then we go to town making "sprinkles". It's fun seeing cardboard packaging in a new light and getting individual vivid colors out of them.


Thursday, June 6, 2013

Pony Bead "Glass" Sun-catchers


For Mother's Day (and yes, I realize that was a whole month ago, but that's the life I lead these days.) the boys and I (with the aid of a nap from the baby.) made sun-catchers out of pony beads. It's really simple and they come out very pretty. They're also long-lasting and hard to break. Winning combination. Even the Fox, who does not like to sit for art, loved making them and has since requested to make them for his teachers' gifts at the end of the year.

Here's What You Need:
  • transparent pony beads (9 mm)
  • metal muffin tin and/or metal cookie cutters and a metal baking sheet
  • a grill (or an oven but it gets kind of a fumey for the indoors.)

Here's What You Do:

     1. Preheat your gas grill to high.

     2. Meanwhile, fill up your muffin tins with patterns (or willy-nilly) of pony beads. Keep it to one layer. Or fill up the cookie cutters set up on the cookie sheet.


      3. Heat up your designs on the grill until the beads melt, about 15 minutes. Keep an eye on the cookie cutters because as the beads melt they might seep under the edges and when they cool it's a lot harder to get the plastic out of the cookie cutter. (I've read on other sites that you can do this in a 400* oven for about twenty minutes, but make sure that if you do, to have your windows wide open- the fumes are overwhelming!)


     4. Cool.


    5. Pop your creations out of their molds. I was surprised how easily the suncatchers came out of the tins. I thought for sure we were going to lose the tin, but just flipping it over and making a quick bang to the underside with a mallet made them pop right out.


   6. Drill a hole in the tops of your suncatchers and string a plastic thread through.


   7.Hang in a sunny spot and enjoy!


 Making these were a huge hit with my kids and a great gift for the grandmothers (and aunts and teachers and the Fox even kept one for himself that he carried around with him for a week.)


* No bake-ware was harmed in the process of this project.

Wednesday, February 6, 2013

Rainbow Crayons

 
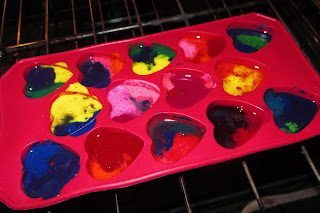
We love to recycle our broken crayons. It seems a waste to throw them away, but who needs broken crayons!? For our valentines this year we made heart shaped crayons with our old, broken crayons. It's very easy and fun to do and you don't need much to do it! There are a lot of ways to do this, but with all the "recipes" all you need is some old broken crayons and a silicone mold (and an oven.).


What You Need:
  • old broken crayons (if you have little kids, you have these.)
  • silicone mold with fun shapes. (You might want to forever designate these to crafting afterward and you can buy cheapy molds at Ikea or Target. I got mine at Target a few years ago in the dollar area.)
  • Knife and cutting board for very thick crayons.


What You do:
1. Peel all the paper off the old, broken crayons.

2. Break them up some more. You may need to cut extra thick crayons with a knife, they're tough to break, but the thin ones are a snap. (literally!) At this point my kids had a great time sorting them into piles of different colors.

3. Have your Octopi fill the molds with bits of crayons. You can do different shades of the same color, do different colors for a swirly rainbow effect, or do themed crayons like "fall" with reds and yellows and oranges and "night" with dark blues and purples and bits of silver for stars.


4. Put the filled molds into a preheated 200* oven just until the crayons melt. Keep an eye on your crayons. They'll take about 15-20 minutes to melt. The kids had a fun time coming to see them melt at different stages.


 5. When melted take the molds out to cool on the counter or put in the freezer to speed the process. Be very careful when taking the molds out of the oven, melted wax is very flimsy and super hot!

6. When cool and hard, pop the crayons out of the molds.

7. Color! Or double stick tape to cards made from card stock with phrases like "You color my world" and "You melt my heart" and gift to other Octopi for Valentine's Day.


*Tip: To clean your silicone molds, spill a little oil in the tray and swish it around. Let is stand for a little bit then scrub our your trays with soap and water. It really cleans up pretty well.