Monday, October 24, 2011

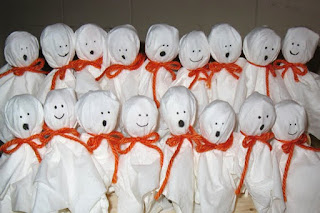
Lollipop Ghosts


I think we've all made these at some point in our childhood, but I just remembered to bring them back this Halloween. They're a quick and easy festive treat to make! And cheap, we like cheap.

What You Need:
  • round lollipops like Charms Blow-Pops or Tootsie Pops
  • tissues
  • yarn cut into 6" pieces
  • black pen/marker

What You Do:
  1. On flat surface lay two unfolded tissues flat on top of each other at an angle so that all 8 corners show.
  2. In the center of your tissues, hold the top of the head of the lollipop down so the stick stands straight up. Pull up the corners of the tissues and twist them around the base of the head so they drape around the stick when turned over.
  3. Tie a yarn tight around the neck at the base and tie a bow.
  4. With the black pen, draw a face. Done!
To show off the ghosts, I made a stand. I took a couple lengths 2x4" pieces of pine from my husband's stash and drilled holes the diameter of the lollipop sticks every inch or so the length of the wood. Then I stuck the pops in the holes and stood the whole thing on the table. Yummy and a great decoration. What's more to love?

Wednesday, October 19, 2011

Pressed Leaf Collage


It's fun to go out hunting for colorful leaves but what to do with them? Spiff had collected so many leaves last year that I was on a mission to do something crafty rather than just toss them.

This is a great, easy fall craft I found online last year. And it's a good way to use old broken crayons bits, to boot. Spiff made several for friends and family to ring in the fall season. He wanted to make so many, we had to go out and collect MORE leaves. This year when I pulled it out to hang, last year's craft looks as nice as when it was first made. (Actually that picture is of the one we kept last year taken today.)


What You Need:
  • wax paper
  • colorful fall leaves (you might want to press them in between heavy books for a couple of days before doing this.)
  • old crayon bits in bright fall colors- greens, reds, yellows., etc.
  • crayon sharpener
  • scissors
  • iron


What You Do:
  • Heat your iron to medium dry heat.
  • Shave your crayon bits in your sharpener until you have a nice pile for sprinkling over your artwork. Set aside.
  • Tear off two pieces of wax paper big enough for your leaves to fit comfortably. Lay one down flat on your protected work surface. (Cut-open brown paper bags are a good way to cover your table.)
  • Let your Octopus arrange the fall leaves on the wax paper.
  • Octopus, sprinkle the crayon bits around your leaves on the wax paper.
  • Gently lay the other piece of wax paper on top.
  • Lay another piece of brown paper or paper towels on top to protect your iron (the crayon wax will squish out the sides a little) and then press and slowly iron your artwork.
  • Let cool. When it's cool, trim the edges and hang in a window.

Wednesday, October 12, 2011

Printable: Five Little Pumpkins

So, we all know that poem. It's my favorite Halloween poem. Okay, I don't know a lot of Halloween poems, but even if I did, I feel confident saying that the one with five little pumpkins would still be a favorite. First of all, "pumpkin" is just a fun word. You know what else is fun that you can do with pumpkins? You can make jack o'lanterns. Whoever invented them is right up there with Thomas Edison in my book. That's right, I said it. So, pumpkins are great. That poem is great. And because I said so, I made this printable. Your octopus can cut and paste those pumpkins right on the gate (or fence, fine, I made a fence) and then, because just pumpkins is never good enough, they can put little faces on them too and make some Jack O'Lanterns. And maybe even some Jill O'Lanterns.


The Printable:

Monday, October 10, 2011

Super Masks!

When my older son turned four, we had a superhero birthday party. I made a bunch of masks for the kids (and adults!) out of foam sheets and some elastic string. Easy peasy. Perfect for parties, Halloween, heck, every day! Get your webslinging action on!


Printable Templates:

Thursday, October 6, 2011

Recipe: Fake Blood

When Spiff was 14 months old he was a Vampire. Because he was in a biting stage. But what kind of a vampire can you be without blood? So I set out to find a recipe for an edible blood suitable for a toddler. And this is what I found out- Corn Syrup! (Yeah, it's my crafting friend, what about it!?)

What You Need:
light corn syrup
red food coloring
blue food coloring
water

And this is where you'll hate me, but it's true, nothing is precise. You just feel it! Start with a quarter cup (or more depending on how much of this stuff you want to make) of corn syrup, and add red food coloring, lots of it, and a drop or two of blue until you get the color you want. Then you just dribble in some water until you get the consistency you want. I added just enough so it slowly dribbled down Spiff's chin and dried there. So, it's not a science! Happy Haunting!

Wednesday, October 5, 2011

"Stained Glass" Leaves


It's fall! The season for beautiful colors and leaf piles for jumping, apples and pumpkins and that fresh cool air that is just perfect for sleep. This week, the kids and I made pretty nifty (if I do say so myself) "stained glass" leaves for the windows out of some construction paper and tissue paper. Tissue paper is really pretty awesome when you shine some light through it and it's cheap and easy to work with. Plus, I don't know about you, but I always seems to have some kicking around.

What You Need:
  • Tissue Paper in fall colors- red, yellow, orange, etc.
  • a piece of black construction paper (though it really could be whatever color, the black just looks nice!)
  • scissors
  • glue, in paste or stick form, whatever.

What You Do:
Print up the leaf template below and cut out the leaf shape you want. Cut strips of tissue paper in varying widths (half an inch to an inch) and in varying lengths that will span the leaf templates. (Really they don't have to be perfect and this is a great time for little hands to practice cutting). You just need enough tissue to span the leaf.

Fold the black piece of paper in half and trace the leaf template onto the paper with pencil. Then cut out the shape through BOTH layers of black . (OK, here you need precision. So you do this while your octopus cuts tissue). Now if the pencil marks bug you (as they do me!) unfold the paper and refold it so the pencil lines are on the inside. :-)

Open the paper back up. Now you have two cut out mirror-image leaves. glue around the right leaf on the black paper. Now spanning the leaf, stick on the tissue strips any which way you feel like it, layer it up, don't, whatever, it all looks great!

Glue around the other, tissue-less, left leaf, getting the edges too.

Now sandwich that piece of black paper back together so the leaves match up, and Voila! Trim any tissue that might have come out the sides and hang it up in a sunny window.

Perty!

The Printable: